Using PowerApps for interactive data entry in PowerBI
1 Oct 2024

While Power BI excels at data visualisation, it lacks built-in features for data entry and direct interaction with the data. This limitation can be a barrier for teams that need to update records or capture new information directly within their dashboards. Enter PowerApps: by integrating it with Power BI, you can create dynamic, interactive tools that not only visualise data but also enable real-time updates and data entry. This blog explores how this powerful combination can overcome Power BI’s limitations, making your dashboards more versatile and empowering your decision-making process.
Example Problem – Gathering comments in PowerBI on marketing campaign statuses
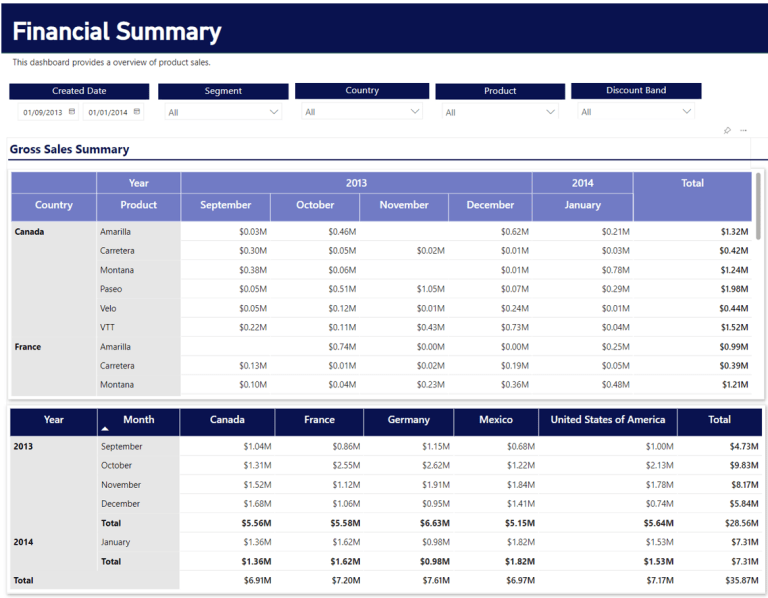
Imagine you’re managing a global marketing campaign across multiple countries, each promoting various products. Gathering comments from your regional managers on how certain campaigns are progressing is crucial for understanding the success of your marketing efforts and making data-driven decisions.
Managing feedback can be challenging, but a great solution is to leverage the capability to easily input comments directly into a PowerBI report, which already displays key metrics such as sales performance and engagement rates. This is where PowerApps comes in.
In this blog, you’ll be guided through a step-by-step tutorial on how to set up this integration. You’ll learn how to create a seamless experience for your team to input and update such feedback directly within your Power BI dashboards, making it easier to keep all your insights in one place.
Step 1: Creating a PowerApps connection and linking a data source
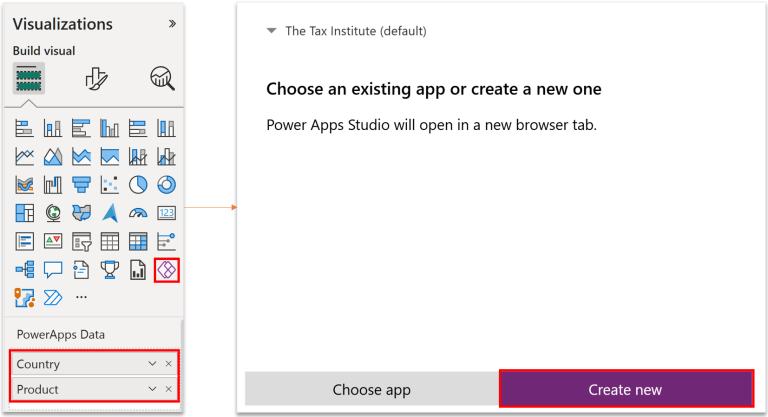
Start by going to the Visualisations pane in PowerBI and finding the PowerApps icon. Select the fields you want to pass to your PowerApp, then choose to either connect to an existing app or create a new one. In this example, we’ll create a new app with fields for “Country” and “Product“. This setup will allow managers to add comments related to a product’s campaign in a specific country.
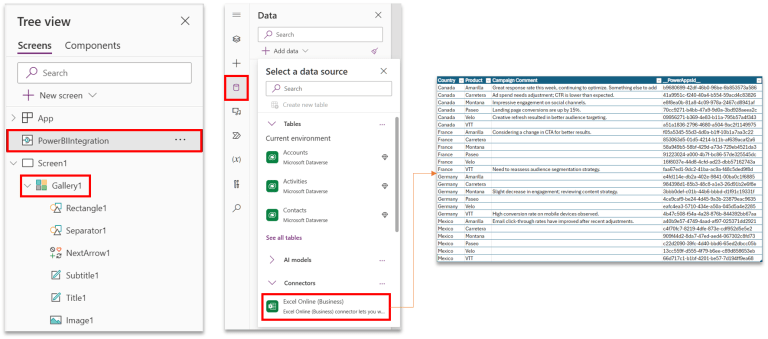
Once you choose to create a new app, you’ll be redirected to the PowerApps Studio. Here, the previously selected fields are automatically passed from PowerBI to PowerApps. You’ll know the connection is successful when you see PowerBIIntegration in the Tree View, and a gallery is automatically added to the app.
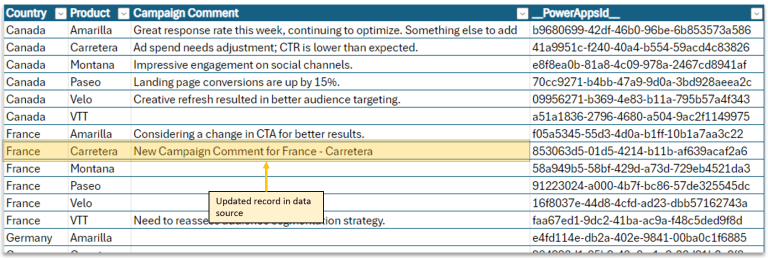
For our data source, we’ll link an Excel Online data connector to PowerApps, which will store any campaign comments in a straightforward table. Now, it’s time to set up the app itself. We’ll configure the gallery to display data passed from Power BI and create a form for managers to input their comments.
Step 2: Customising your PowerApps
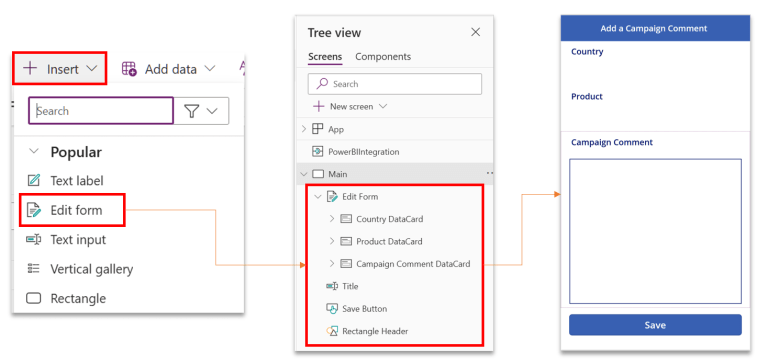
Since we’re collecting comments on campaigns, we’ll replace the default gallery with an Edit Form.
Our form will be simple: it will display the selected “Country” and “Product,” and include a free-text field for users to add their campaign comments.
We’ll also add a “Save” button and change the OnSelect property to Submit the Form. Once the form’s layout and elements are in place, the next step is to integrate the write-back functionality.
Step 3: Integrating write-back capability in your PowerApp
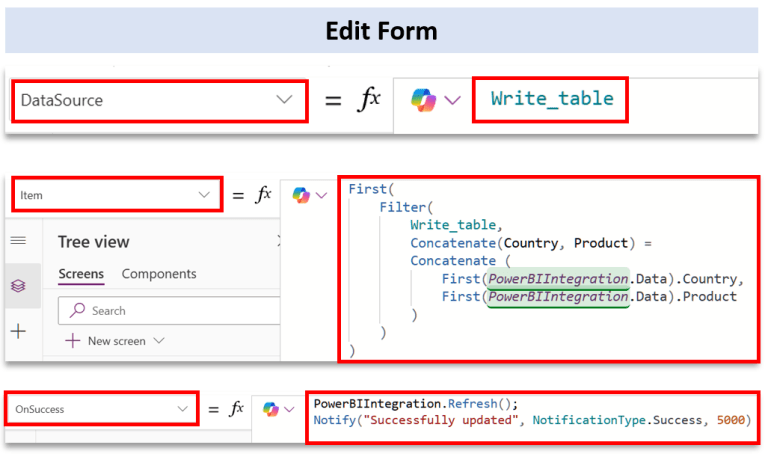
To enable write-back, we’ll set the DataSource property of our Edit Form to the table in our Excel Online spreadsheet. This will allow the form to be pre-populated with saved campaign comments corresponding to a selected combination of Country and Product.
Next, we’ll use the PowerBIIntegration.Data function in the Item property of the form to filter the write-back table for the selected data passed from Power BI. This ensures the form updates the correct record.
Finally, we’ll update the OnSuccess property of the form to refresh the data, ensuring the app shows the most current information. We’ll also add a pop-up notification to confirm that the comment was successfully saved.
Final Result: An embedded PowerApp in PowerBI, capable of write-back
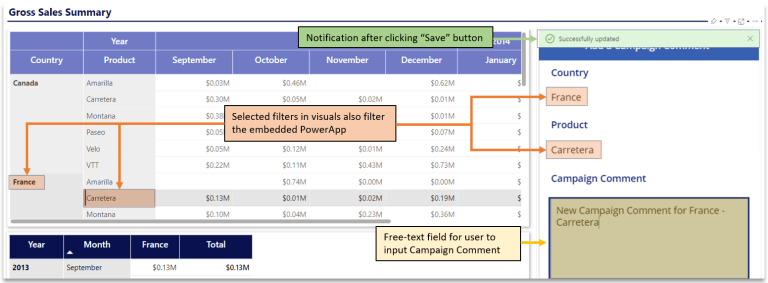
Once your PowerApp is saved and published, refreshing your Power BI tab will load the latest version of the app.
Filters applied through visuals or slicers will also filter the embedded PowerApp, enabling an intuitive and interactive way to write back campaign comments for the selected Country and Product.
Final Remarks
This blog showed how integrating PowerApps with Power BI can solve the challenge of capturing real-time feedback on marketing campaigns. By embedding a PowerApp within your dashboard, you can collect comments and insights directly from your team, making decision-making more efficient.
Why does this matter? If you’re managing large datasets or need constant updates, this integration keeps everything in one place, saving time and improving collaboration.
If you’re looking to elevate your business intelligence solutions even further, EdgeRed can help you unlock the full potential of PowerApps and Power BI, delivering customised solutions that drive smarter decision-making. Contact us to learn how we can help you optimise your processes and make your data work harder for you.
This post was written by Daniel.
About the author
Daniel is a senior data analyst with a background in actuarial studies & commerce, specialising in financial technology. Daniel excels in power automate, leveraging it to enhance workflow automation and efficiency. Additionally, known as the resident excel expert, he stays up-to-date with the latest features, using his mastery to streamline processes and generate impactful data insights. His favorite excel formula is XLOOKUP—work with him long enough, and you’ll be using it like a champ. Outside of work, he enjoys staying active through walking and badminton, playing the piano, and sharing his love for mathematics by teaching high school students.
About EdgeRed
EdgeRed is an Australian boutique consultancy with expert data analytics and AI consultants in Sydney and Melbourne. We help businesses turn data into insights, driving faster and smarter decisions. Our team specialises in the modern data stack, using tools like Snowflake, dbt, Databricks, and Power BI to deliver scalable, seamless solutions. Whether you need augmented resources or full-scale execution, we’re here to support your team and unlock real business value.
Subscribe to our newsletter to receive our latest data analysis and reports directly to your inbox.


