Creating approval flows in Power Automate
27 Aug 2024

Approval flows are a powerful way to streamline your processes, ensuring timely approvals without manual intervention. In this tutorial, we’ll walk you through the steps to create effective approval flows in Power Automate, using the free version of the tool.
What is an Approval Flow?
An approval flow is an automated workflow designed to facilitate the approval of documents and processes. For example, if you need your project lead’s approval on a document by the 2nd of every month, an approval flow can automate this process, eliminating the need for manual reminders and emails.
Creating a simple Approval Flow
For this tutorial, we’ll use the example of sending a document to your project lead for approval on the 2nd of every month. In addition to the above four steps, we can also set up alerts and monitor the flow for activity through audit reports – which are topics we can explore further in future blog posts.
A trigger is an event that initiates the flow. There are three types of triggers:
Scheduled: A flow that runs at a scheduled date / time at a scheduled frequency, for example, sending an email daily at 2 am.
Automated: A flow that runs when an event occurs, for example, send an email when someone uploads a file in Google Drive or SharePoint
Instant / Manual: A flow that is triggered manually and sent to the user instantly.
You can read more about the triggers here.
In our example, we will use a scheduled flow.

Once you click Create Flow, a Recurrence trigger should appear. You can select the timezone to match your location.

Just like preparing ingredients before cooking (mise-en-place), we need to gather all necessary information before adding further actions. For our example, we’ll fetch the file content from Google Drive that needs approval from the project lead. You might need to sign in and give the flow access to your Google Drive.

After signing in, use the Get file content using path action to retrieve the file content.

Next, we’ll Initialise a Variable for the Approver’s comments. We’ll use this variable later in the flow to compile all approvers’ comments. For now, leave the initial value blank.

In this step, we initiate and wait for an approval outcome. There are two main approval types:
Everyone must approve: All assigned approvers must approve the request.
First to respond: Approval is granted once the first approver responds.
Further, you can also define custom values. For example, instead of indicating ‘Approve/Reject’, you have ‘Yes/No’ values.

Be sure to link the dynamic content File Content in the Item Link field. You can do this by clicking the thunderbolt icon next to the field.


Based on the approvers’ responses, you can define the next steps. To do this, add a Condition action.

Then we define actions for when the above condition is met.

Here’s how you can define actions based on the approval outcome:
- The report is approved
If the report is approved, we can send the report to the client via the ‘Send email (V2)’ action. An example of how the email looks like is given below:

- The report is rejected
If the report is rejected, we can send the approvers’ comments to the analyst who prepared the report. For this purpose, we loop through each of the approvers’ comments and append them to our string variable.

Then we can format the email to the analyst as follows:

In either case, don’t forget to attach the File Content to the email.
If you’ve followed this tutorial closely, your flow should look like this:

Although the flow is set to trigger on the 2nd of every month, you can quickly test it by clicking the Test Flow button. Select Manually to run the flow, and the approval process will begin.

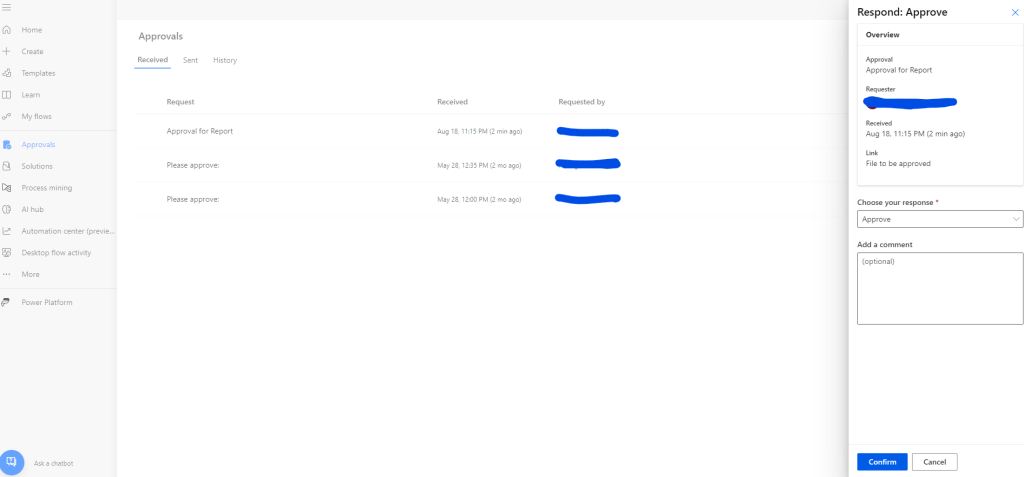
Approvers will receive a request like this:

Alternatively, they can access their approval requests from their Microsoft Teams or Power Automate website.

The Approvers can also leave comments when they are approving the request. If the report is approved, the client will receive an email like this:

If the request is rejected, the analyst will receive an email like this (including the approvers’ comments if any).

Final remarks
This concludes our tutorial on creating a simple Approval Flow. From here, you can modify the flow to trigger when a report is uploaded, add multiple approvers, or set up alerts and monitoring.
By automating these processes, not only do you save time, but you also reduce the potential for human error, ensuring that critical tasks like approvals are handled efficiently and consistently. Power Automate’s flexibility allows you to tailor workflows to your specific needs, making it a valuable tool for enhancing productivity across your organisation.
Frequently Asked Questions (FAQs)
Yes, Power Automate allows you to set up approval flows with multiple approvers and define unique conditions for each approver. You can choose whether all approvers must approve the request or if the first response is sufficient. Additionally, you can create custom actions based on the outcome of each approval, ensuring that the process meets your specific requirements.
Power Automate provides built-in tools for monitoring and auditing your flows. You can access flow run history, view detailed reports, and set up alerts to track the performance and status of your approval flows. This ensures you have full visibility into the process and can quickly identify and resolve any issues.
Absolutely! Power Automate integrates seamlessly with other Microsoft 365 apps like Teams, SharePoint, Outlook, and OneDrive. You can trigger flows based on events in these apps, send approval requests directly through Teams or Outlook, and even store approved documents in SharePoint or OneDrive. This integration enhances collaboration and streamlines your workflow across different platforms.
This post was written by Sai.
About the author
Sai is a Data Analyst with a PhD in Astrophysics. She is experienced in data wrangling, analysis and process automation. In her spare time, Sai enjoys painting digitally and traditionally. She also loves making merchandise including our internal EdgeRed wall decals, invitations, bookmarks and stickers.
About EdgeRed
EdgeRed is an Australian boutique consultancy with expert data analytics and AI consultants in Sydney and Melbourne. We help businesses turn data into insights, driving faster and smarter decisions. Our team specialises in the modern data stack, using tools like Snowflake, dbt, Databricks, and Power BI to deliver scalable, seamless solutions. Whether you need augmented resources or full-scale execution, we’re here to support your team and unlock real business value.
Subscribe to our newsletter to receive our latest data analysis and reports directly to your inbox.


